PurTube® Accessories

Instructions for the PurTube accessory package: the NGT+ backflow diverter, replacement mouthpieces and Smart Adapters — with fitting, care, cleaning and sterilization.
- NGT+ — nasogastric tube backflow diverter
- Replacement parts for NGT+ — mouthpieces
- Smart Adapter — tube adapter, funnel, spike & key
Plasticizer & phthalate free · Made with FDA grade materials · Made in USA · Patent pending
What’s in the package
NGT+
Patented backflow diverter for the oral end of the nasogastric tube.
Replacement mouthpieces
Fresh mouthpieces for the NGT+.
Smart Adapters
Tube adapter, funnel, spike & key — modular accessories for bag or bottle attachment.
Using a uterine lavage tube? See the PurTube Uterine Lavage Tube instructions.
- Package
- Smart Adapter
- Funnel
- Bag spike
- NGT+
- Replacement mouthpieces
- Fitting & removing
- Care & cleaning
- Sterilization
- Quick reference
The Smart Adapter system

The Smart Adapter screws onto the end of the tube using the included key. It attaches without narrowing the 8 mm internal diameter and forms a secure, removable base for your accessories. Because the adapter screws on and off, you can cut the tube to whatever length suits your practice and simply re-fit the adapter to the new end.
Accessory 1 — Funnel
Attaches to the Smart Adapter and secures to the neck of a bottle, so lavage fluid transfers from the bottle into the uterus without spills or disconnection.
Accessory 2 — Bag spike
Attaches to the Smart Adapter and spikes a bag of sterile fluid for a secure, closed transfer from the bag into the uterus.
NGT+ backflow diverter
The NGT+ doesn’t change how you tube — it’s an interface that sits on the oral end of the nasogastric tube and diverts backflow away from your mouth. Intended for single-procedure use. If you are tubing an animal, the device should function for the entire procedure, but there are several items you should know about the NGT+.
How to use the NGT+ — step by step
Attach and position
Fit the NGT+ securely onto the oral end of the nasogastric tube and place the mouthpiece in your mouth.Pass the tube
Introduce the tube through the ventral meatus and advance to the nasopharynx; a swallow signals it’s ready to enter the esophagus.Insufflate
With the device in the downward position, blow through it to dilate the esophagus and ease the tube toward the stomach. Resistance is felt at the cardiac sphincter.Backflow diverts automatically
Once in the stomach, any air or fluid traveling back up the tube pushes the internal seal up and exits the port — away from your mouth.Treat, then remove
Detach the NGT+ to connect a pump for fluids, then reattach and blow the remaining tube contents into the stomach. Kink the tube and remove.
NGT+ components

Mouthpiece

Body
To avoid any potential malfunctions, make sure to keep liquids away from the main body.
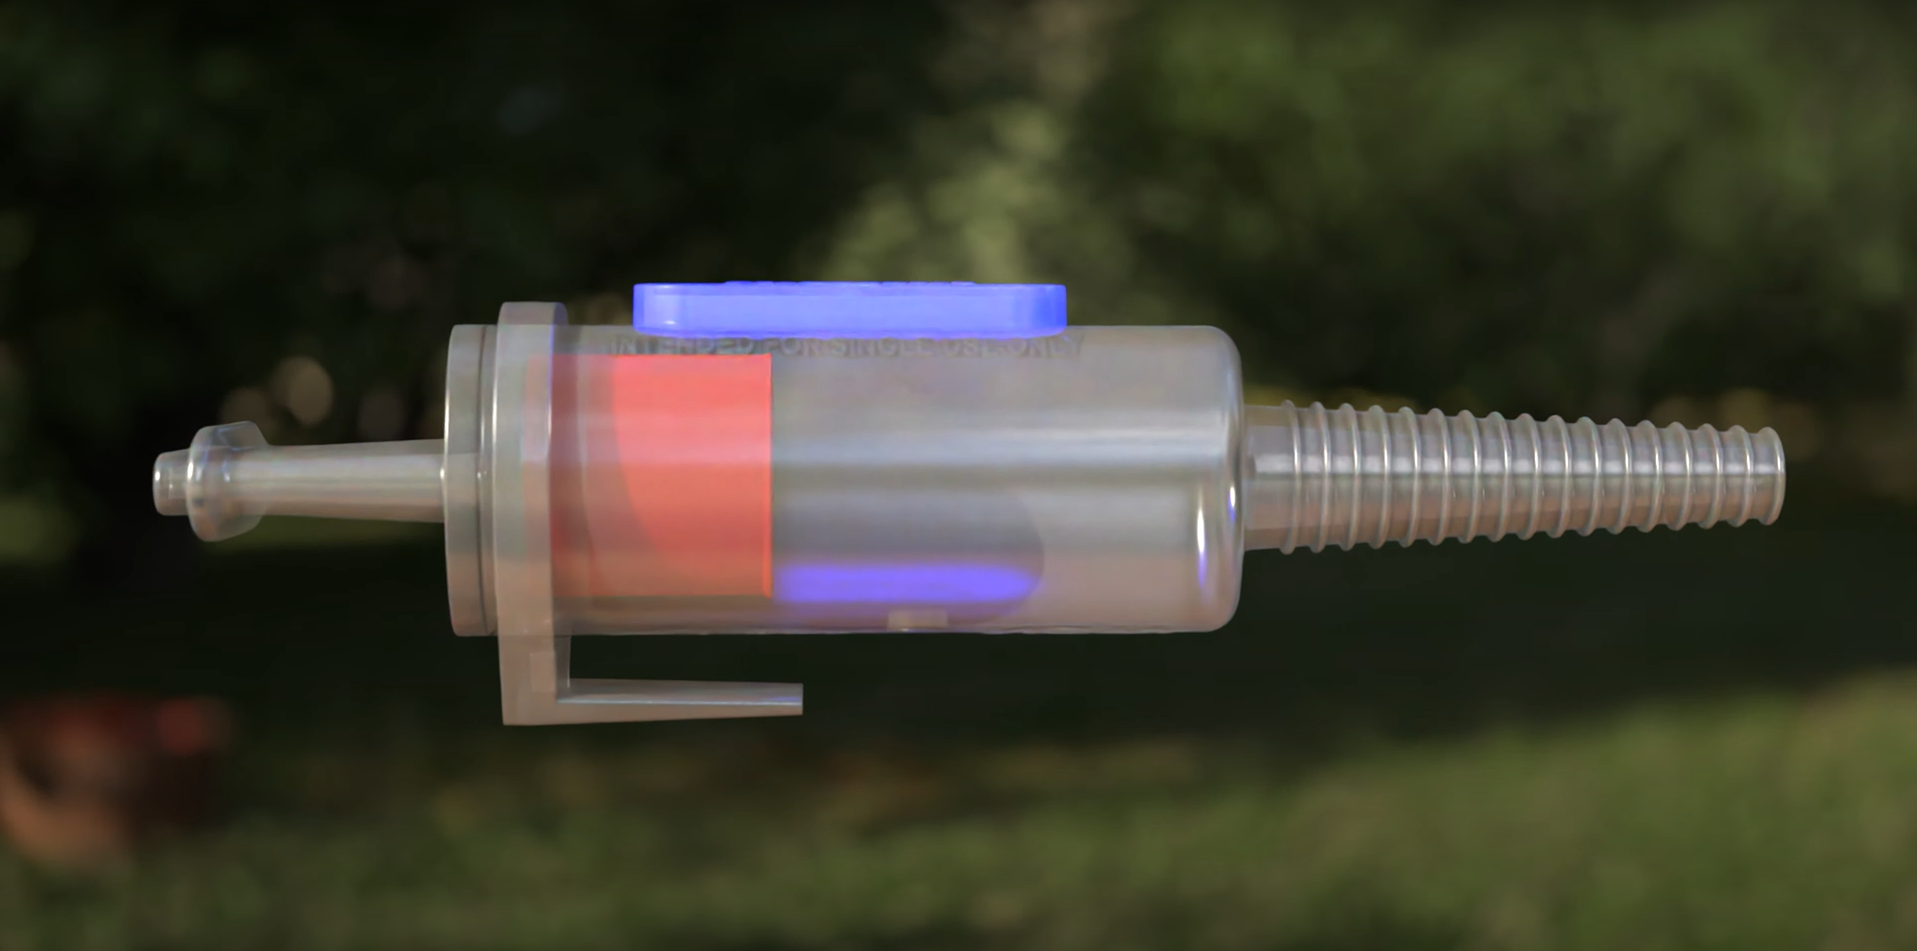
Air channel cover
The air channel cover is designed to remain attached to the device; removing it will compromise the device’s functionality.

Achieving a seal
To achieve a proper seal with this device, you can create negative pressure. You’ll notice improved suction if your finger covers the exit hole. If negative pressure is present in that area, the slide will remain stationary.
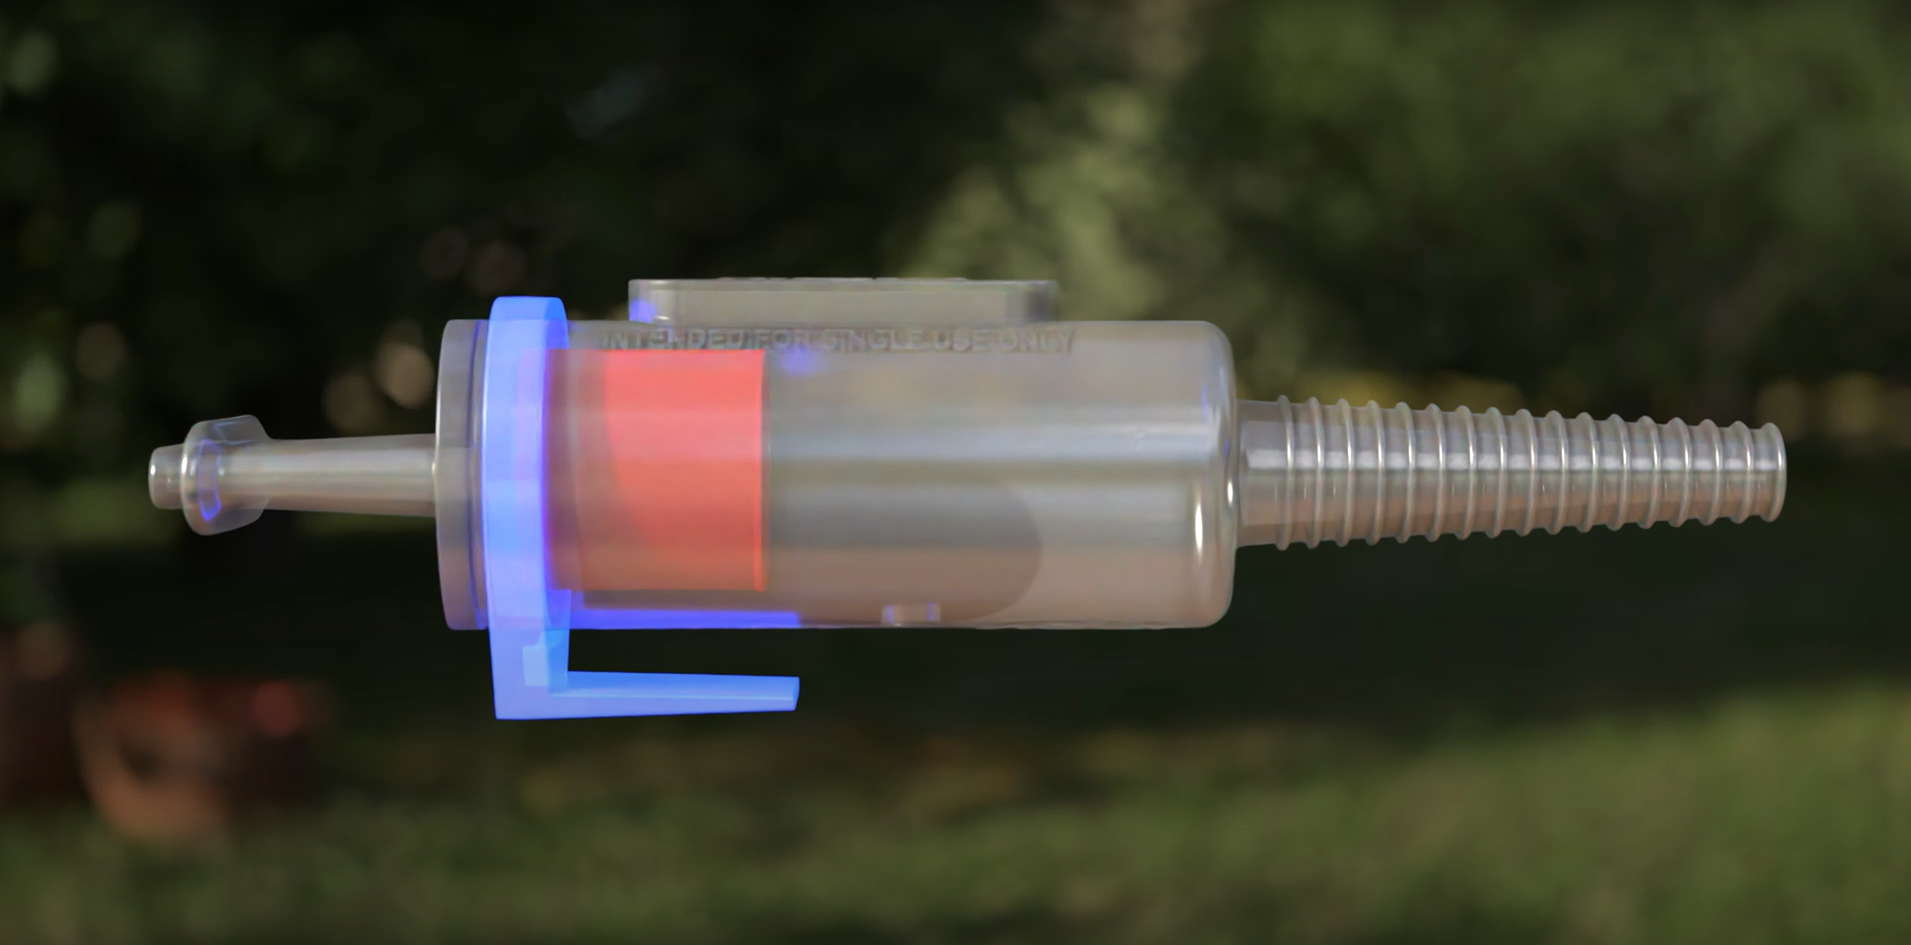
Clip
The clip can be effortlessly removed. It is designed to attach to the halter, ensuring the device remains upright.
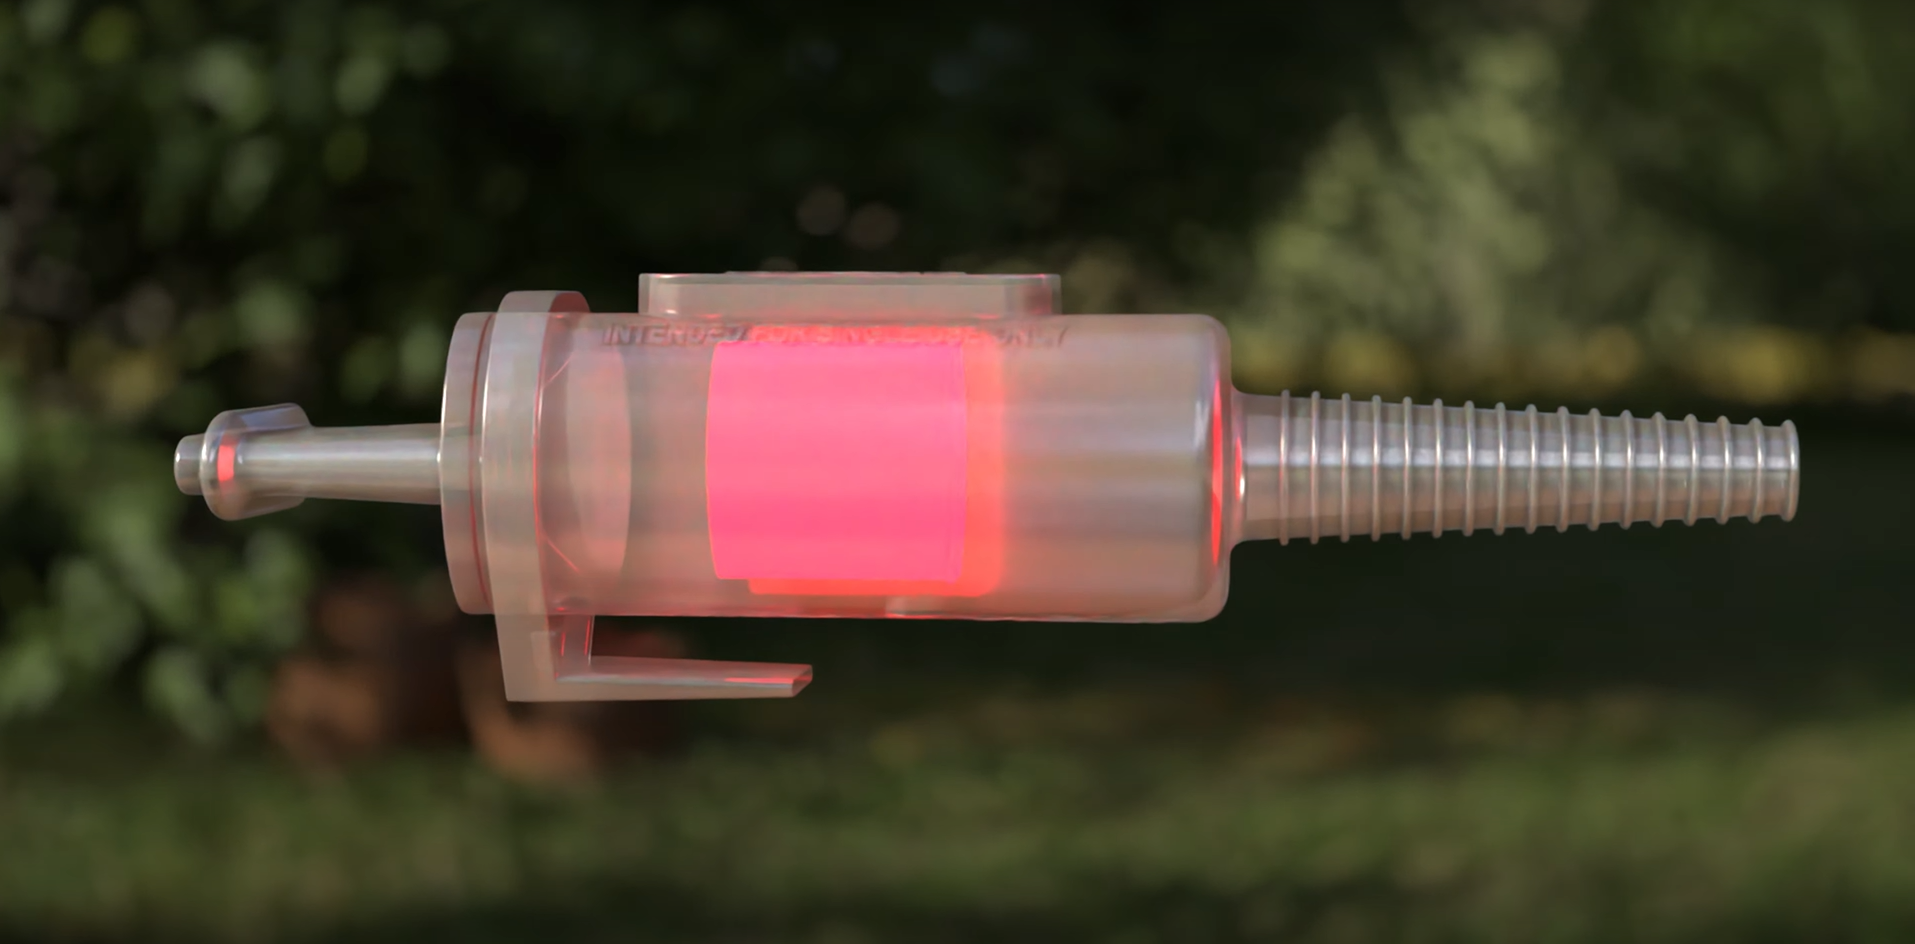
Slide

Tube fit
This device is crafted to accommodate both smaller and larger tubes. It securely fastens to the end of the tube, creating a solid yet removable connection that facilitates hands-free insertion of the tube into the stomach.
NGT+ care
Do not steam autoclave the NGT+. The mouthpiece is not rated for autoclaving — the PurTube cleaning and sterilization steps on this page do not apply to it. Replacement mouthpieces are available in the shop.
- Keep liquids out of the main body.
- Keep the air channel cover attached. If the cover breaks off in the field, it can be taped in place.
Replacement mouthpieces
The NGT+ mouthpiece is not rated for steam autoclaving. Rather than autoclaving it, fit a replacement mouthpiece. Replacement mouthpieces are included in this package and are also available in the shop.
See NGT+ components for where the mouthpiece sits on the device.
Fitting & removing the Smart Adapter
Cut to length (optional)
Cut only the outer end — never the formed, vented insertion end. The centimeter rule reads from the insertion end, so the mark where you cut is the finished length. Cut the tube squarely with a sharp blade or tubing cutter — a clean, straight end seats and seals best. Do not crush the tube with scissors.Engage the key
Seat the included key on the Smart Adapter.Screw the adapter on
Align the adapter with the tube end and turn the key clockwise until the adapter is fully seated and snug. Do not over-tighten.Attach your accessory
Fit the funnel (bottle) or the bag spike (fluid bag) to the adapter. Check the connection before filling.To remove
Detach the accessory, seat the key and turn counter-clockwise to unscrew the adapter from the tube.
Care & cleaning — step by step
Clean the tube and components as soon as possible after each use. Dried organic material is harder to remove and can shield microorganisms from disinfection and sterilization.
Wear gloves and eye protection when handling used tubes and cleaning solutions.
Remove the accessories
Detach the funnel or bag spike from the Smart Adapter.Remove the Smart Adapter
Use the key to unscrew the adapter from the tube (turn counter-clockwise). Every component is cleaned separately — nothing stays assembled.Pre-rinse
Immediately flush the tube lumen with clean, lukewarm water until it runs clear, and rinse the outside. Rinse the adapter, funnel and spike, paying attention to threads and grooves.Wash
Flush the lumen and wipe the exterior with a mild, neutral-pH or enzymatic detergent. Use a soft brush sized to the bore where available. Scrub adapter threads and accessory surfaces with a soft brush. Rinse thoroughly.Disinfect in dilute chlorhexidine
Submerge the tube and components in dilute chlorhexidine: 1 part 2% chlorhexidine solution to 10 parts water.- Fill the lumen completely — lift and tilt the coil so no air pockets remain inside.
- Soak for the contact time stated on the disinfectant label.
- Do not use solvents such as acetone, or abrasive cleaners, which can damage the tube surface and print.
Final rinse
Flush the lumen and rinse all components with sterile or distilled water to remove disinfectant residue.Allow to dry
Hang the tube vertically with both ends open so the lumen drains completely, and let the components air-dry on a clean surface. Dry fully before packaging — trapped moisture interferes with sterilization and invites growth.Inspect
Check the tube for cuts, kinks, cracks, clouding or stiffness, and check the adapter threads and accessories for wear or damage. Replace anything that is damaged.Package & sterilize
Loosely coil the tube (no tight bends or kinks), pouch it with the Smart Adapter and accessories unassembled, and sterilize by one of the methods below. Record the tube number and load for traceability.
Sterilization
The tube, Smart Adapter, funnel, bag spike and key are all compatible with the following methods. Always follow your sterilizer manufacturer’s instructions and your facility’s validated cycles. These methods do not apply to the NGT+ — see NGT+ care.
All components
Steam (autoclave)
Coil loosely and pouch. Components must be disassembled. Use your facility’s validated cycle for plastic items. Allow the full dry cycle and let the load cool before handling — polyurethane is softer while hot.
All components
Ethylene oxide (EtO)
Components must be completely dry and disassembled. Complete the full aeration period before use.
All components
Gas plasma
(Hydrogen peroxide gas plasma.) Components must be completely dry. Confirm your system’s lumen length and diameter limits for a tube of this length.
Do not sterilize with the Smart Adapter screwed into the tube or with accessories attached — sterilant must reach every thread and surface. Do not use a tube that is cracked, cloudy, stiff or has a damaged end; cut back to sound tubing or replace it.
Quick reference
After every use
Remove accessories → unscrew adapter with key → pre-rinse → wash → dilute chlorhexidine soak → final rinse → hang to dry → inspect → pouch → sterilize.
Storage
Store sterile, loosely coiled, in its pouch, in a clean, dry place away from direct sunlight and heat.
VetGadgets · Dog House Innovations LLC · 4491 Midtown Drive, College Station, TX 77845
Questions? Gadgets@vetgadgets.com · vetgadgets.com
PurTube® is a registered trademark of VetGadgets. For veterinary use only.